Introduction
This is part of a series of articles describing the creation of a simple iOS app. A complete list of the articles is included in the first part A Simple Swift iOS App from Start to Finish - Introduction.
I have set up a web site for the finished app at http://DaysWithoutThings.com and you can download it free directly from the app store:
In this article I am going to create the Edit View for my app. This is the most complex view in the app. I have set up a web site for the finished app at http://DaysWithoutThings.com and you can download it free directly from the app store:
The steps involved in adding my Edit View are:
Add a new View to my storyboard.
Add a navigation Item to the new view.
Add a TextField control to hold the name of the thing being edited.
Add a Segmented control to represent whether the thing will be tracked for days with or days without.
Add labels to hold the current and record days for the thing.
Add a reset button.
Add the Edit View to my storyboard
Adding a new view to my storyboard is just a matter of dragging a new ViewController on to my storyboard.


Add a navigation Item to the view
My view will need a navigation bar to enable the user to return to the List View. To add this I have to drag a Navigation Item from the Object Library on to the view controller.


The Navigation Item is created with the default title 'Title'. I will change this in the Attributes inspector to 'Edit'. This is the Title that will appear at the top of the view.

Adding controls in Interface Builder
I am going to follow the same procedure for adding each of the controls to my Edit View. Firstly I am going to add them in order with each positioned below its predecessor. I am then going to set their pin constraints to anchor them relative to their predecessor and relative to the sides of the view. Once I have done that I will have to use the Fix misplacement option to update their frames to match their constraints.
Add a text control to hold the name of the Thing
The first control I am going to add to my Edit View is a text field to hold the name of the thing being edited.


Next I am going to set three constraint to anchor the text file to the top and side margins of my view.

This creates several warnings as the new constraints do no match the current frame of the control.

I fix this by clicking the yellow warning triangle in the object tree and selecting 'Update frame'.


My Text field now matches its constraints.

The final thing I want to add to my text field is some placeholder text to identify its purpose.

Add a Segmented Control
I am going to use a Segmented Control to give the user the option of selecting whether the thing should track its days with or days without.

I will drag this on to my view below my text field and set the constraints to anchor it to the sides and to a vertical position relative to my text field.


This will creates some warnings.

I will fix these by clicking on the yellow warning triangle and selecting the update frame option.
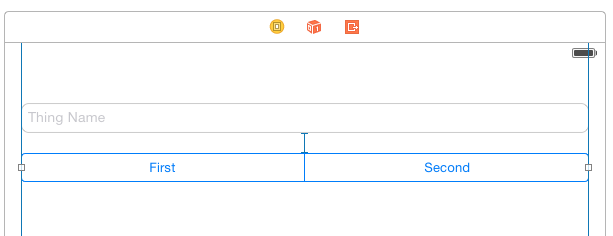
The next step is to change the titles of the two segments via the Attributes Inspector and set the second one to be the option selected by default.

Add Labels for the day counts
Next I am going to add two labels to display the current and record number of days.

After I have set the constraints and fixed the frame I will use the Attributes Inspector to set the text that will be displayed.

Adding the reset button
The final control on my Edit View is the reset button. This button will enable the user to reset the current number of days to zero.

Just like the labels above after I have set the constraints and fixed the frame I will use the Attributes Inspector to set the text that will be displayed.

Wrapping up
The UI for my edit view is now complete. Before moving on I will then commit it to source control.
In my next article I will start to create the main code for my app.
Next: A Simple Swift iOS App from Start to Finish - Implementing the Main View's Code Part 1
In my next article I will start to create the main code for my app.
Next: A Simple Swift iOS App from Start to Finish - Implementing the Main View's Code Part 1
Next: A Simple Swift iOS App from Start to Finish - Implementing the Main View's Code Part 1
No comments:
Post a Comment