Introduction
Custom table view cells are a powerful way to extend the functionality of table views. In this article I am going to demonstrate how to create a custom table view cell in Interface Builder using as little actual code as possible.
Creating a Test Project
I will start by creating a test project. I am going to use the Single View Application template with Swift.


Creating a Table View
The first thing I am going to do with my test project is to replace the View Controller that was created by the template with a TableViewController.
To do this I am going to open the Main.storyboard file in Interface Builder and select the View Controller in the Document Outline and press delete.

Next I will drag a TableViewController from the Object library on to the storyboard.

This immediately adds a couple of warnings to my project.

The first warning means that my storyboard has at least one view controller but none of them are set to be the initial view controller. I can fix that by checking the option in the Attributes inspector with my new TableViewController selected. The storyboard has to be saved before the warning is removed.

The second warning is that the prototype cell that was created automatically with my table view controller must have its reuse identifier set. I will do this now by selecting the prototype cell and adding a reuse identifier in the Attributes inspector.

The reuse identifier is used by the table view code to cache instances of cells as a way to optimize their creation.
The final step in preparing my table view controller is to rename the Swift file and the class it contains from ViewController to TableViewController and change the class it inherits from to UITableViewController. Swift does not support the Rename refactoring option so I will have to do this all manually.


Laying out my Custom Cell
My Custom cell is going to be quite simple. I am just going to have a label with a switch next to it. To begin with I am going to drag each control directly into my prototype cell's content view and position them in roughly the right places.


Next I will select both the label and the switch and add an alignment constraint to align them both to the center of the cell's content view.


This will generate two warnings that the controls' horizontal positions are ambiguous. These will be fixed in the next step.
Next I am going to set the horizontal position of the switch to anchor it to the content view's right margin.

This will replace the warning about its horizontal position to a warning about its frame being misaligned. I am going to fix that now by clicking the orange triangle next to that warning in the Document Outline and then clicking 'Fix Misplacement'.


Next I am going to pin the left edge of my label to the left margin on the cell's content view.

This leaves me with the same warning about the frame being misplaced so I am going to fix it using the same process as above.

The final step for my layout is to set the labels right edge to be 8 pixels from the left edge of the switch.

This generates another frame warning which I will fix in the same way as the ones above.

Connecting my Cell's Controls
For my new cell to be useful I need to connect the controls so that I can read and write the values they display and react when they change. I will start by creating a subclass of UITableViewCell in a new Swift file.
When a new swift file is created Xcode only includes the 'import Foundation' statement. I added the UIKit import for the definition of UITableViewCell. Next I will select my custom cell in Interface Builder and set its custom class to my new subclass.
 With the main editor still showing the storyboard I will open my subclass in the Assistant editor.
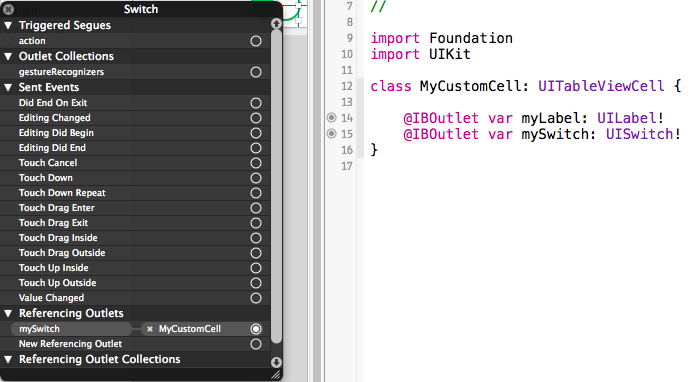
 To create an outlet I will right click on the label control and drag from the empty circle next to 'New Referencing Outlet' to the body of my class.


Clicking Connect creates the outlet property.

I will repeat the process for my switch control.
import Foundation
import UIKit
class MyCustomCell: UITableViewCell {
}
This opens a prompt to define the name and other attributes of the outlet.
Clicking Connect creates the outlet property.
I will repeat the process for my switch control.
Responding to an Action
The next thing I want to do is to create a method to respond when the user changes the state of the switch control. As an added complication I want to respond to this action in my table view controller class rather than my custom cell class. I want to do this because my custom cell class is only intended to display the data it is given and not actually interact with the data source.
The first step is to create an IBAction method in my TableViewController class. Saving the Swift file will cause an empty circle to appear next to the method.

Next I need to make sure the Table View Controller in the Storyboard is set to use my TableViewController class.

I can then drag from the empty circle next to the method in the Assistant Editor to the Switch control in the storyboard.

Finding a Custom Cell from One of its Controls
The IBAction method is called with the control that triggered it as its only parameter. When working with a custom cell it is usually more useful to have a reference to the cell. The Document Outline, in Interface Builder, shows that the control is actually a child of the cell's content view so the code to retrieve a reference to the cell needs to take that into account.
@IBAction func didChangeSwitch(sender: UISwitch) {
var contentView = sender.superview!
var cell = contentView.superview! as MyCustomCell
var indexPath = tableView.indexPathForCell(cell)
}
The final line retrieves the index of the cell in the table.
Testing my Custom Cell
To test my custom cell I need to add some items to my table. To do this I need to add a couple of methods from the UITableViewSource protocol. The UITableViewController class already inherits from this protocol so I can just go ahead and override the two methods I need.
Firstly the tableView numberOfRowsInSection method tells the table view how many rows should be populated.
This will tell the table view to expect to have 7 rows. I will ignore the section parameter as I will only have one section in my table.
If I try to run my app now it will crash. This is because the tableView will try to call its cellForRowAtIndexPath method for each of the rows it expects and I have not implemented that method yet.
The dequeueReusableCellWithIdentifier method will either return a previous instance of my MyCustomCell class that was cached by the table view and is ready for reuse or return a new instance created using the identifier to construct the instance from the storyboard definition.
Once I have a cell object I set its label to the name of the row and set alternate rows' switches to be on or off.

When I run my app it works. However it does generate a warning message.
The row height is defined in the Size inspector in Interface Builder. However there is no explicit constraint to tie the height of the content view to this and no obvious way to add that constraint.

This can be fixed by overriding the table views heightForRowAtIndexPath method and returning the same value from there.
Once this is done the warning no longer appears.
The last thing I want to test is that my IBAction method is called when I change the value of the switches. To do this I am just going to add some logging to my didChangeSwitch method.
I now see log messages whenever I tap a switch.
My custom cell is now complete.
Firstly the tableView numberOfRowsInSection method tells the table view how many rows should be populated.
override func tableView(tableView: UITableView, numberOfRowsInSection section: Int) -> Int {
return 7
}
If I try to run my app now it will crash. This is because the tableView will try to call its cellForRowAtIndexPath method for each of the rows it expects and I have not implemented that method yet.
override func tableView(tableView: UITableView, cellForRowAtIndexPath indexPath: NSIndexPath) -> UITableViewCell {
var cell: MyCustomCell = tableView.dequeueReusableCellWithIdentifier("MyCustomCell", forIndexPath: indexPath) as MyCustomCell
cell.myLabel?.text = "Row \(indexPath.row + 1)"
cell.mySwitch?.on = indexPath.row % 2 == 0
return cell
}
Once I have a cell object I set its label to the name of the row and set alternate rows' switches to be on or off.
When I run my app it works. However it does generate a warning message.
2014-10-29 07:43:17.644 CustomCellDemo[5011:313348] Warning once only: Detected a case where constraints ambiguously suggest a height of zero for a tableview cell's content view. We're considering the collapse unintentional and using standard height instead.
This can be fixed by overriding the table views heightForRowAtIndexPath method and returning the same value from there.
override func tableView(tableView: UITableView, heightForRowAtIndexPath indexPath: NSIndexPath) -> CGFloat {
return 44
}
The last thing I want to test is that my IBAction method is called when I change the value of the switches. To do this I am just going to add some logging to my didChangeSwitch method.
@IBAction func didChangeSwitch(sender: UISwitch) {
var contentView = sender.superview!
var cell = contentView.superview! as MyCustomCell
var indexPath = tableView.indexPathForCell(cell)
println("Row: \(indexPath!.row) : \(cell.myLabel.text!) : \(sender.on)")
}
Row: 2 : Row 2 : false
Row: 3 : Row 3 : true
Row: 2 : Row 2 : true
No comments:
Post a Comment