Introduction
This is part of a series of articles describing the creation of a simple iOS app. A complete list of the articles is included in the first part A Simple Swift iOS App from Start to Finish - Introduction.
I have set up a web site for the finished app at http://DaysWithoutThings.com and you can download it free directly from the app store:
In this article I will be implementing the code for the Edit View. The Edit View will be used for two purposes within my app. Firstly, when a new thing is added to the List View the Edit View will be opened automatically to enable the user to edit the characteristics of the new thing. Secondly, the Edit View will be opened when the user selects an existing thing within the List View.I have set up a web site for the finished app at http://DaysWithoutThings.com and you can download it free directly from the app store:
The Edit View will enable the user to change the name of any of their things to anything they want. However it will enforce two limitations. If the name is left blank the Edit View will show a warning and ignore the edit. If the new name is a duplicate of another existing thing the Edit View will also issue a warning and ignore the edit.
I am going to implement the code for the Edit View in six stages:
1. Create a new UIViewController subclass for the edit view.
2. Link the controls in the storyboard view to the new class.
3. Add a property to hold the current thing.
4. Populate the view from the current thing.
5. Add code to open the Edit View from the List View.
6. Add code to validate and save the edits the user makes.
Create the Edit View's Class
I am going to start by right clicking on my projects folder and selecting New File.Then iOS - Source - Swift File.

I will call my new file EditViewController.

I will then define my new class within the new file.
import Foundation
import UIKit
class EditViewController: UIViewController {
}
The final step in creating the new class is to associate it with the Edit View in the storyboard.

Link the Storyboard Controls to the new Class
At this point I am going to hide the Project Navigator and the storyboard's object tree and open the assistant editor. This lets me see my Edit View in Interface Builder with my new class next to it.

I need to be able to set the value of all of my controls except the reset button through code. To do this I need to create reference outlets for each of them. This is done by right clicking on the control and then dragging from the empty circle next to New referencing outlet into the body of my class definition. When I release the drag I am prompted to set the name and type of the outlet variable.

Once I enter the name and click 'Connect' the new outlet is created in my class code with a filled circle in the margin next to it to show that it is connected.
I am now going to repeat this process for the other controls.
class EditViewController: UIViewController {
@IBOutlet var nameField: UITextField!
@IBOutlet var withSwitch: UISegmentedControl!
@IBOutlet var currentDays: UILabel!
@IBOutlet var recordDays: UILabel!
}
@IBAction func didTapResetButton(sender : AnyObject) {
}
@IBAction func didChangeWithSwitch(sender : AnyObject) {
}
Add a property to hold the current thing
The Edit View is going to be shown in response to the users actions in the List View. When it is shown the List View's code needs to control which Thing the Edit View displays. To enable this I am going to add a currentThing property to my EditViewController class. The class will also need a reference to the global AppDelegate class to enable it to save any changes it makes to the Thing being edited.
class EditViewController: UIViewController {
@IBOutlet var nameField: UITextField!
@IBOutlet var withSwitch: UISegmentedControl!
@IBOutlet var currentDays: UILabel!
@IBOutlet var recordDays: UILabel!
var currentThing:Thing?
let appDelegate:AppDelegate
required init(coder aDecoder: NSCoder) {
appDelegate = UIApplication.sharedApplication().delegate as! AppDelegate
super.init(coder: aDecoder)
}
Populate the view from the current thing
The Edit View will need to populate its controls with the properties of the current Thing object whenever it is shown. To achieve this I am going to override its viewWillAppear method and call a new method I will implement to update its controls.
override func viewWillAppear(animated: Bool) {
super.viewWillAppear(animated)
updateControls()
}
func updateControls() {
if let thing = currentThing {
nameField.text = thing.name
withSwitch.selectedSegmentIndex = thing.withSwitch == false ? 1 : 0
currentDays.text = "Current Days: \(thing.currentDayCount)"
recordDays.text = "Record Days: \(thing.recordDayCount)"
} else {
nameField.text = "Undefined"
withSwitch.selectedSegmentIndex = 1
currentDays.text = "Current Days:"
recordDays.text = "Record Days:"
}
}
Add code to open the Edit View from the List View
There are two places in the List View code where it needs to show the Edit View. Firstly immediately after a new Thing is added and secondly when an existing Thing is selected in the table. To facilitate this I am going to add a method that shows takes a Thing as its parameter and opens the Edit View to display that thing. I am going to put the code for this method in my original class definition for ListTableViewController.
Because I am going to be showing the Edit View from code the first thing I need to do is to give it an identifier in the storyboard.
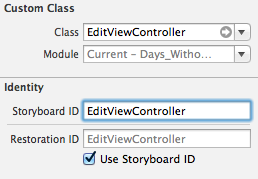
Now I can go ahead and implement my method to show the Edit View.
func showEditViewForThing(thing:Thing!) {
let storyboard : UIStoryboard = UIStoryboard(name: "Main", bundle: nil);
let editController : EditViewController = storyboard.instantiateViewControllerWithIdentifier("EditViewController") as EditViewController;
editController.currentThing = thing
navigationController?.pushViewController(editController, animated: true)
}
The first line gets a reference to the storyboard using its file name. The second line calls the storyboard method to create an instance of my EditViewController class. The third line sets the Thing object to be displayed and the final line calls the navigationController's pushViewController method to actually show the Edit View.
I am going to call my new method from two places within the ListTableViewController class. Firstly I will call it immediately after adding a new Thing in the didTapAdd method.
@IBAction func didTapAdd(sender: AnyObject) {
var thing = createNextNewThing()
reloadData()
showEditViewForThing(thing)
}
Now when I tap add the newly created Thing is immediately shown in the Edit View.
I will also call my showEditViewForThing when the user taps on an existing thing in the list. To do this I need to override another tableview method.
override func tableView(tableView: UITableView, didSelectRowAtIndexPath indexPath: NSIndexPath) {
var thing = appDelegate.thingCollection?.things[indexPath.row]
showEditViewForThing(thing)
}
The second line calls my shows that Thing in the Edit View.

override func viewWillAppear(animated: Bool) {
super.viewWillAppear(animated)
reloadData()
}
Add code to validate and save the edits the user makes
There are three things the user can do to edit a Thing.
1. Change the name
2. Change between With and Without.
3. Reset the current number of days to zero.
The last two are the simplest to implement. I have already connected the IBAction methods for the segmented control and button so I just have to fill in their implementation.
@IBAction func didTapResetButton(sender : AnyObject) {
appDelegate.thingCollection?.resetDaysForThing(¤tThing!)
updateControls()
}
@IBAction func didChangeWithSwitch(sender : AnyObject) {
currentThing?.withSwitch = withSwitch.selectedSegmentIndex == 0 ? true : false
appDelegate.saveContext()
}
The didChangeWithSwitch changes the Thing's withSwitch property and the uses the appDelegate to commit the change to the store.There is no need to update the Edit View's controls after this because the segmented control automatically changes its display and no other controls are affected by this change.
Validate the Name Text Field
Validating a UITextField requires the creation of a delegate that implements UITextFieldDelegate protocol. I am going to add an extension to my EditViewController class to do this.
extension EditViewController: UITextFieldDelegate {
}
Within this extension I will then implement the protocol's textFieldDidEndEditing method. This is called when the text field stops being the first responder.
func textFieldDidEndEditing(textField: UITextField) {
if textField == nameField {
if textField.text == currentThing?.name {
return
} else if textField.text.isEmpty {
textField.text = currentThing?.name
showIsBlankWarning()
} else if appDelegate.thingCollection!.thingExists(textField.text) {
textField.text = self.currentThing?.name
showIsDuplicateWarning()
} else {
saveNewName(textField.text)
}
}
}
The next if statement checks if there is already a Thing in the collection with the same name. If there is it will reset the current Thing's name back to whatever it was before it was edited and then show a warning message.
The final else clause calls a method to save the new name. Obviously this clues is only reached if the new name passes all the validation steps.
My app will use the UIAlertView class to show its warning messages.
func showAlert(message: String) {
var theAlert = UIAlertView(title: nil, message: message, delegate: nil, cancelButtonTitle: "OK")
theAlert.show()
}
func showIsBlankWarning() {
showAlert("Could not save blank name.")
}
func showIsDuplicateWarning() {
showAlert("Could not save duplicate name.")
}


func saveNewName(name:String) {
currentThing?.name = name
appDelegate.saveContext()
}The final step is to set the UITextField's delegate. I will override the viewDidLoad method and set the delegate within it.
override func viewDidLoad() {
super.viewDidLoad()
nameField.delegate = self
}
Wrapping up
I have now completed the code for my List and Edit Views and can now edit the things I track in my app.
In my next article I will finish the Main View's code.
No comments:
Post a Comment